
Getting ReelFlow installed and working
To add the ReelFlow Player to your website, you will need to add one short line of code to every page on your website.
This code allows the ReelFlow to work across the website, and allows you to publish Flows that appear to your visitors on any page.
You only need to add the Install Code once, and generally you do not need to make other changes to the HTML.
Steps to Install
1. Check the Workspace URL set in ↗️ Settings > Workspace - it must exactly match the website domain or subdomain you wish to install the code on.
For example, www.example.com and blog.example.com are treated as different subdomains and will require separate Workspaces and Install Codes. There is one exception, www.example.com and example.com are seen as the same URL.
2. Find your Install Code in the ReelFlow Dashboard under ↗️ Settings > Install Code.
If the code is not yet installed or working, you will see this message:

3. You can install the code in a few different ways. The options are as follows:
4. Once the code is added to the head of all pages your website, return to these instructions to verify your installation.
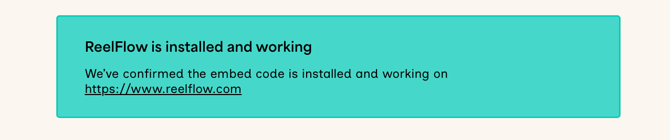
5. On the Installation page on the ReelFlow Dashboard, Hit Verify Installation, if the install is successful, you will see the below message:
6. You have now added your install code and can Preview and Publish your Flows!
If the installation wasn't successful - head to Troubleshooting - Install Code
If you still need help, contact us.
Installing ReelFlow Install Code using the HTML code (recommended)
- Navigate to ↗️ Settings > Install Code on the ReelFlow Dashboard
- Copy and paste the code found here into the
<head>section of every page on your website - Go back to the ↗️ Installation page, click Verify Installation
Installing ReelFlow Install Code using Google Tag Manager
Note: Installing via Google Tag Manager can be convenient, however we strongly would recommend installing using the HTML code instead because some browsers like Safari, or browsers in private browsing mode, will always automatically block all Google Tag Manager content, irrespective of it's purpose.
Google Tag Manager can also introduce a noticeable delay before the Player appears, particularly on pages with other tags - see Optimising your Google Tag Manager installation for speed below if this affects you.
- Open Google Tag Manager
- Go to
Tagsand clickNewat the top-right. - Change where it says
Untitled Tagand name itReelFlow - Click on the
Tag Configurationbox - Under
Custom, selectCustom HTML - Copy and Paste the Install Code found in your ReelFlow Dashboard in ↗️ Settings > Install Code into the
HTMLfield - Check the
Support document.writecheckbox - Click the
Triggeringbox - Add the
All Pagestrigger - Click
Save - Click
Submitat the top-right - Add relevant details and click
Publish - Go back to the ↗️ Installation page, click Verify Installation
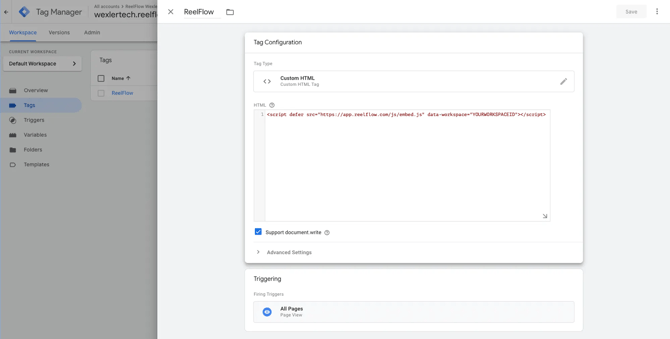
Note: Take care to complete all the steps above, the Tag may not load correctly if you fail to complete step 7, to check document.write
Optimizing Google Tag Manager installation to improve speed
Because Google Tag Manager needs Support document.write checked on the ReelFlow tag, the Player has to wait its turn among every other tag in the container, rather than loading in parallel the way it does on the direct HTML install.
If Players are taking longer than a few seconds to appear, work through the following inside your GTM container:
- Open the ReelFlow tag and expand Advanced Settings.
- Under Tag firing priority, set a higher value (e.g.
100) than your other tags. Tags with a higher priority fire first when they share a trigger. - Under Tag Sequencing, make sure neither "Fire a tag before this tag fires" nor "Fire a tag after this tag fires" is set.
- Check the tag's trigger is set to
All Pages(Page View), notWindow Loaded. Window Loaded waits for every image, font and script on the page to finish before firing, which is a common cause of a long delay. - Under Consent Settings, check whether "Require additional consent for tag to trigger" is enabled. The ReelFlow Player does not set cookies, so this is rarely required — if it's ticked without a specific reason, the tag will wait for the visitor to interact with your cookie banner before it fires at all.
- Use GTM's Preview mode against your live page to see exactly when the ReelFlow tag fires relative to your other tags.
If your page runs a large number of tags ahead of ReelFlow, or you need the fastest possible load regardless of GTM configuration, ↗️ installing using the HTML code removes this bottleneck entirely, since the Install Code loads with defer and isn't subject to Tag Manager's firing order.
Installing on Squarespace
The installation method on Squarespace uses their Code Injection feature, and to use this you must be on a Business or Commerce plan, not a Personal plan. You may avoid this restriction by using the Google Tag Manager installation instructions instead.
- Open the ↗️ Code Injection panel in Squarespace.
- Navigate to ↗️ Settings > Install Code in your ReelFlow Dashboard, then copy and paste the code shown on this page into the Code Injection field for the header.
- After adding your code, click Save.
- Go back to the ↗️ Installation page, click Verify Installation
Installing on a Hubspot website
- In your HubSpot account, click the settings icon in the top navigation bar.
- In the left sidebar menu, navigate to Content > Pages.
- In the upper left, click the **Choose a domain to edit its settings dropdown menu and select the domain.
- To edit the header for the domain, click Override default settings in the Site Header HTML section if not already enabled.
- In your ReelFlow Dashboard, Navigate to ↗️ Settings > Install Code, then copy the code shown on the page, and paste it into the Site Header HTML in Hubspot settings.
- In the bottom left, click Save to apply your changes.
- Go back to the ↗️ Installation page, click Verify Installation
Installing on a Webflow website
- In your Webflow Dashboard, click on the 3 dots icon next to your site and navigate to Settings
- In the left sidebar menu, navigate to </> Custom code > Head code section
- Go to your ReelFlow Dashboard, navigate to ↗️ Settings > Install Code, then copy the code shown on the page, and paste it into the Head code section.
- Click Save and Publish your site for the changes to take effect.
- Go back to the ↗️ Installation page, click Verify Installation
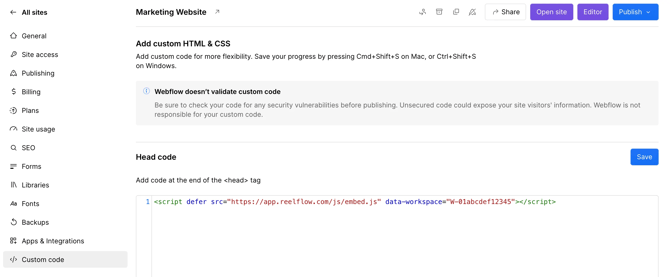
Note: The Custom Code feature is only available on paid Webflow plans. If you’re on a free plan, you won’t see this tab.
Installing on a Wordpress website
- Ensure you have the Insert Headers & Footers plugin by WPCode installed. (↗️ View installation instructions on the official Wordpress Support website).
- Go to your ReelFlow Dashboard, navigate to ↗️ Settings > Install Code, then copy the HTML code shown.
- On your Wordpress site’s dashboard, navigate to Code Snippets > Header & Footer.
- Paste the code into the Header box.
- Click “Save Changes“.
- Go back to the ↗️ Installation page, click Verify Installation
Note: Do not add the ReelFlow Install Code via a minimization or compression plugin as this may affect it’s ability to work.