
How Flows are added to website pages
Once the ReelFlow Install Code has been added to your website correctly, Flows can be published on any pages you choose.
The target page where a Flow appears is known as the Activation URL or Activation Page.
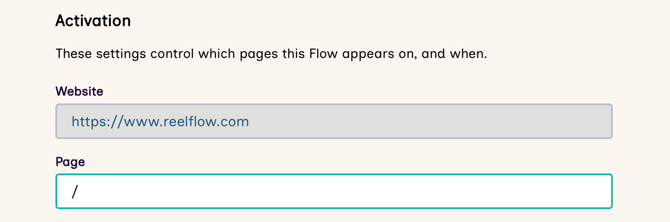
Set the page where a Flow will be shown (the Activation Page)
To ensure that the Player is shown on a web page, you need to set the Activation Page.
- From the Dashboard, open a Flow in the Flow Builder and choose Edit
- Switch to the Activation tab in the Flow Builder
-
Set the Page by adding the address of the page on which the Flow will appear e.g.
/about.html - You can now Preview or Publish the Flow on this page.
Showing one Flow on several pages at once
We are trialling a new feature which allows a Flow to match the first part of the page URL entered and therefore it can appear on multiple pages. All performance metrics are combined and count as one entry against that Flow. To request access to this feature, please contact our support team.
To show a Flow on several pages at once:
-
Switch to the Activation tab in the Flow Builder.
-
Configure the following:
- Page: Specify the URL of the root page where the Flow will appear on your website e.g.,
/about/(relative to the Activation URL for your Workspace)
- Page: Specify the URL of the root page where the Flow will appear on your website e.g.,
- Toggle on the "The show the Flow on all pages where the URL starts with this" switch
- This would match and show on all sub-pages e.g.
/about/,/about/company
Important things to note about using this feature:
-
All performance metrics are combined into a single Flow report (in the example, against
/about/). You are not able to filter or differentiate between the indiviudal pages. - If you enable this on your homepage (i.e.
/), it will load on every page across your website - We do not warn if your Flow clashes with other Flows assigned to specific pages when using this feature
- We do not support wildcard or regex page matching. This URL matching feature is designed for simple situations where the URL contains extra information you want to ignore. It is however possible to disable the player by writing some custom code using our Player API.
- We ignore anchors (#my-element) and query parameter strings (?query=true) and do not match based on these URL elements
Activation Settings for Overlay Players
Setting when the Eye-catcher will appear (the Activation Point)
Choose when an Overlay Flow Eye-catcher shows for a visitor:
- Immediately on page load
- After the visitor has started scrolling
- After 3 second delay on page load
- After 5 second delay on page load
Hiding the Eye-catcher

-
You can disable the eye-catcher entirely, which is useful if you only wish to launch the Overlay Player with a click, from a button, link or other page element.
Activation Settings for Inline Players
Setting the Target Element
Inline Players require an additional setting, the Target Element. This is the empty space on a page where an Inline Player will be inserted.
For information on selecting or creating an appropriate Target Element on the webpage for the Inline Player, see our guidance on adding the Inline Player to a page.
Setting the Video Fit
Choose how you wish the videos in your Flow to appear within the Inline Player.
-
Optimized is best for videos focused on a single person, talking to camera. The video fills out the Player and may crop.
- Reveal is best for videos containing more than one subject, or where the content is wide. The whole video will be visible in the frame, with no cropping.
Setting Inline Player Dimensions
Read our articles on setting player dimensions, or more advanced guide for web developers.