
Great quality video can be achieved at home or in the office with the right preparation.
Watch the video below for some top tips:
Step-by-Step Guide to Recording
1. Lighting
-
Position: Place your light source (ring light or window) directly in front of you at face height.
-
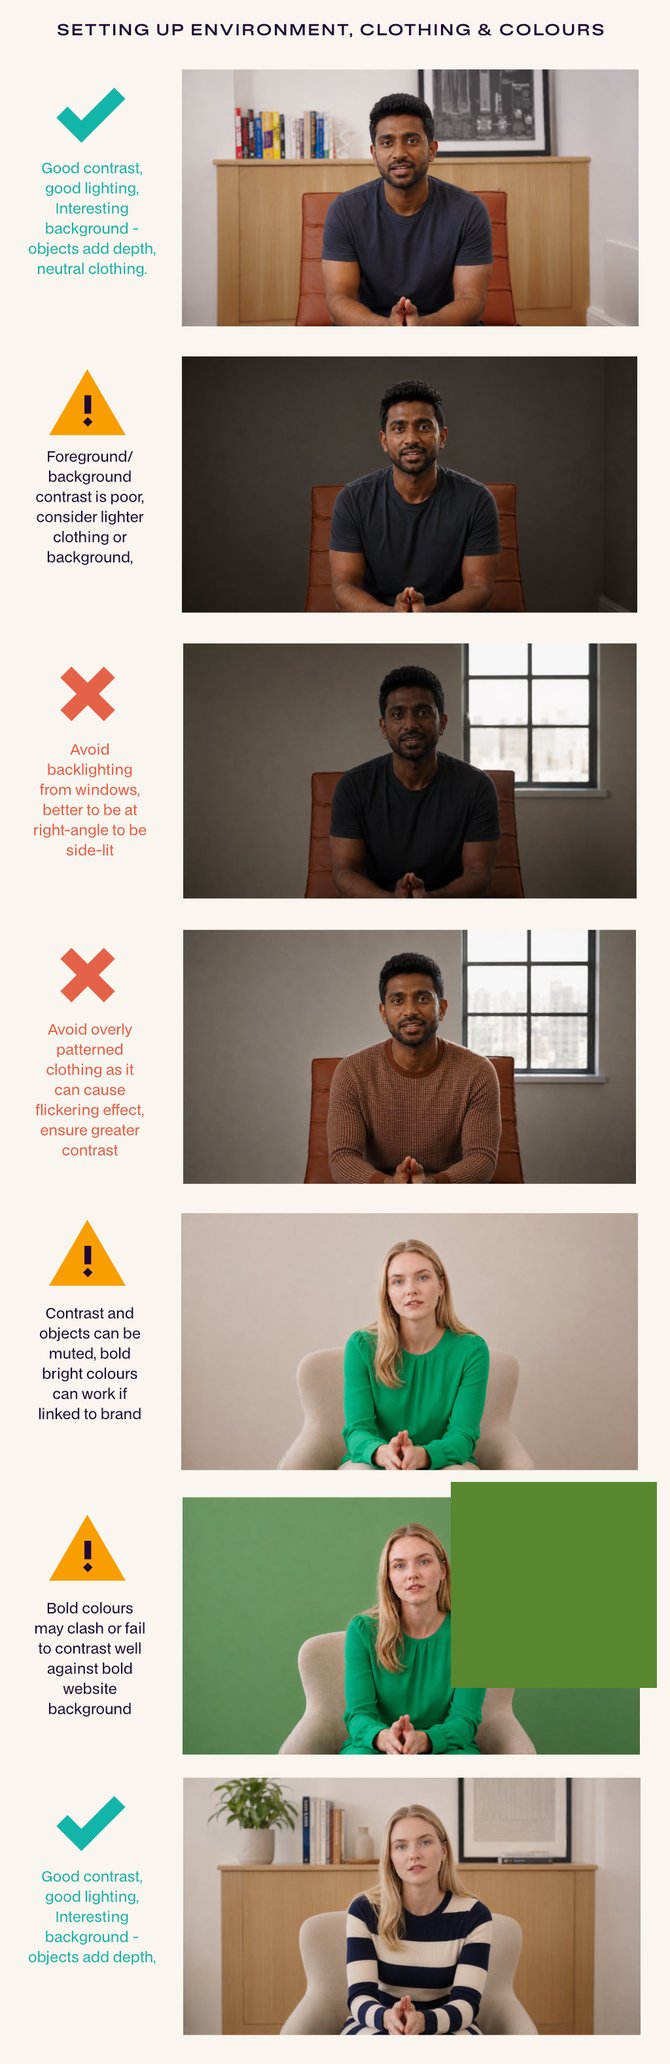
Shadows: Avoid sitting with a window behind you, as this will turn you into a silhouette.
-
Softening: If the light is too harsh, bounce it off a nearby wall to soften the glow.
2. Sound
-
Environment: Record in a quiet room with soft furnishings (rugs, curtains, cushions) to reduce echo.
- Equipment: Use an external microphone or a clip-on lavalier mic for the best clarity. Don't use bluetooth microphones like airpods, they introduce lag.
3. Background & Composition
- Background - brand & contrast: A simple or unfussy background with some objects placed behind to add depth is usually most effective, as a completely plain background can look stark. Also consider the existing tone of your website; using a texture or colour that adds contrast but complements your website background colour can be very effective. Avoid wearing dark clothes, on a dark background on a dark website, as the overall effect reduces visual interest.
-
Depth: Step away from the wall to avoid shadows and create a sense of depth. Keep the background clean and professional.
-
Auto-tracking: If using a tracking mount, ensure it is locked onto your face before you begin.
-
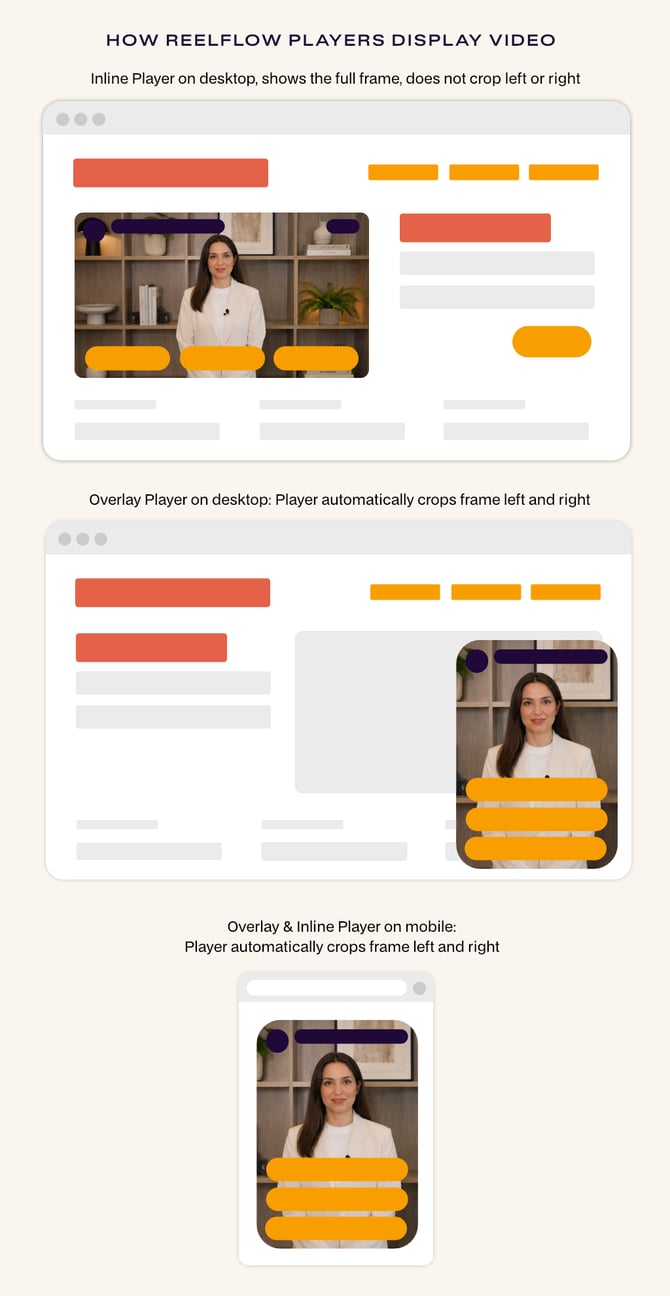
Safe Zones: Avoid placing text or important elements at the far left or right edges, as the ReelFlow player may crop these slightly to fit different screen sizes.
4. Camera & Framing
- Record at least 1080p resolution on a good quality camera: the back-facing camera on most modern smart phones is excellent (the front camera or web cameras should be avoided)
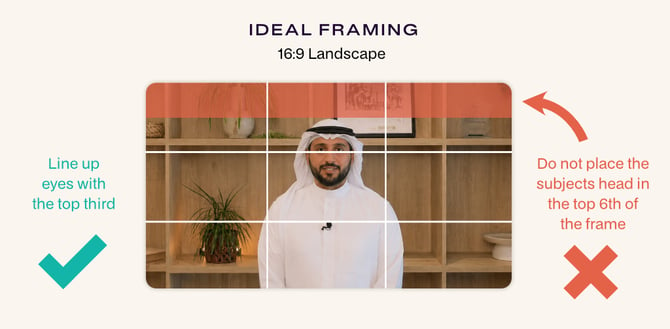
- Only record in landscape (horizontal) format (16:9): the ReelFlow player automatically optimizes video content for each of the Player Types, Inline & Overlay. Important: video shot in portrait is not suitable and will need to be reformatted .
- Positioning, Composition & Framing: Place the camera at eye level. Centre yourself in the frame with your head and shoulders visible, leaving a small gap above your head.
- It's useful to be aware of how the ReelFlow Player will automatically crop the frame, and where it will place items over the video, depending on the available space and device:
5. Scripts and Video Duration
- Duration: Keep each video under 2 minutes. Our interactive experience is best when populated with short clips separated by "Action Buttons" to create a much better navigational experience for the visitor. Learn more about managing duration by scripting appropriately in our scripting guide.
6. What to Wear
The camera picks up textures and contrast differently than the human eye and this can affect the end result more than you expect, so follow these useful tips:
-
Colors: Stick to solid, mid-tone colors like navy, slate grey, or jewel tones. Avoid neon (too bright), solid black (loses detail), or solid white (can "blow out" the image).
-
Patterns: Avoid small pinstripes or tight checks; these cause a flickering effect called moiré. Opt for solid colors or large, subtle textures.
-
Fit & Grooming: Wear well-fitted clothes you feel comfortable in. You can use matte makeup or powder to reduce shine on the forehead and cheeks. Ensure your outfit is ironed.
-
Accessories: Keep jewelry minimal and "silent" (avoid jangly bracelets).
7. Tips for a Natural Delivery
-
The "Lead-in": Start recording, take a deep breath, smile, and then begin talking. Leave a few seconds of silence at the end before stopping. This makes trimming much easier.
-
Eye Contact: Look directly into the lens, not at the screen, to simulate a face-to-face conversation.
-
Don't Stop for Mistakes: If you mess up, just pause and restart the sentence. It’s easier to trim one long take than to manage dozens of tiny files.
-
Scripting: If using a script, place it as close to the camera lens as possible so your eyes don't wander.
-
Pro Tip: If you have a modern iPhone, use the Continuity Camera feature—it usually offers much higher quality than a standard computer webcam.
After recording & preparing to upload
-
Trim tightly: Cut the video exactly where the speech starts and ends to keep the experience snappy. We provide simple trimming tools inside the Dashboard too, but it's always better to trim neatly before upload.
-
Naming: Name your files sanely so you can find them later e.g.
Homepage_Step1.mp4 -
Upload: Head to the Library to upload your videos. Files must be under 100MB. If you need more details on video file formats and resolution, consult our full guide to preparing and exporting video footage to upload into ReelFlow.
Prefer some professional assistance?
Check out the Marketplace for recording options with studios, editors and videographers